
We decided we needed to see a little more progress on the boat given that boat projects have slowed down quite a bit with the grandsquids moving in with us. I know how Deb and I are and we need a bit of motivation in order to give us the fuel for the next project. Life is about little victories for us.
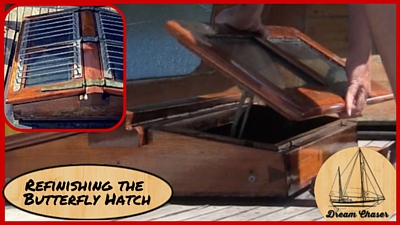
We decided to refinish the butterfly hatch in the center of the salon roof. This was a good project that shouldn’t take too long, it would involve woodworking, metal polishing and varnishing and finishing. Right up our motivational feed bag.
We started by removing the screws that held on all of the bronze hinges, snaps for the sunbrella cover and all of the latching assemblies from the inside of the hatches. Once removed it was time to sand the old finish off of them.

We may have been able to get away with just a buff sanding and new coats of varnish because of all of the topsides of the boat, this was in about the best shape of any of it due to being covered most of the time. But it was time to get down to some direct teak and see just what all of this boat will look like when the bright work is redone.
After I started to sand the hatch frame on deck I noticed it was a little loose. After some pulling and tugging, I realized that it was not even fastened to the deck of the boat at all. No wonder it leaked a bit. I went ahead and removed the frame as well to make it easier to sand and finish.
 I took all of the part over to the storage shed and prepared the surface for finishing. This was done by sanding off all of the old finish and then working up the grits to 220. In some places I had to start with 100 which is much more coarse than I would normally want to do but the years of varnish was being a bit too stubborn.
After everything was at 220 grit, I wiped it all down with paint thinner to remove any of the oils on the surface of the wood. Teak is a very oily wood and it is important to remove that oil from the surface for a good adhesion of the finish.
The first coat was cut at 75% varnish and 25% paint thinner. This is done to keep the first few coats very thin and able to absorb into the surface of the wood into the pores of the wood to help create a good smooth and solid base for future coats. I went ahead and did the next coat at about 85% varnish to 15% thinner and then started using full strength varnish for all coats after that.

Some tips for getting a great varnish finish.
- Proper Preparation of the surface, sand the surface to 220 and wipe all surfaces with acetone or thinner. When dry and only when dry, apply the first coat.
- First coat should be thinned 75/25 to allow it to get into the pores of the wood
- Never shake your varnish can, only stir it to avoid getting air bubbles in the varnish which will make the surface rough and not look good
- Never dip your brush into the varnish can, always pour it into a separate vessel with just what you will need for that varnish session.
- If using a chip brush or foam brush (which is fine for the first 5-7 coats) get it good and wet in paint thinner then dab it dry before using it on the varnish. This eliminates air caught in the brush that will also get into the surface
- Varnish where dust is at a minimum as dust can really do a number on the smoothness of the varnished surface.
- Allow each coat to dry completely hard before applying the next coat to avoid a sticky or gummy surface which is especially important in hot or humid areas.

 The challenge here is that I really like the look when bronze gets a nice patina surface on it, but in order to remove the varnish, some parts of the bronze was very shiny and I wanted it to patina evenly so I ended up polishing them all the way and won’t keep it looking like that over time.
If you are receiving this blog via email or on a device that won’t play the embedded video, click this link for the 3 part playlist directly on Youtube. The link is https://youtu.be/xBGW1frNscI?list=PLlwpbgibX_O_OWvzr8BLwOsIjndHAgzs7